Blueberry Crumble
This week's feature is a curvy beauty that needed a little sparkle.
~ A Sweet Little Treat for the Home ~
Blueberry Crumble
Hello my Sweets!
That wonderfully wavy, serpentine front called me from across the thrift store floor! But how to get from thrift store find to treasured heirloom piece of furniture?? Read on my friends!

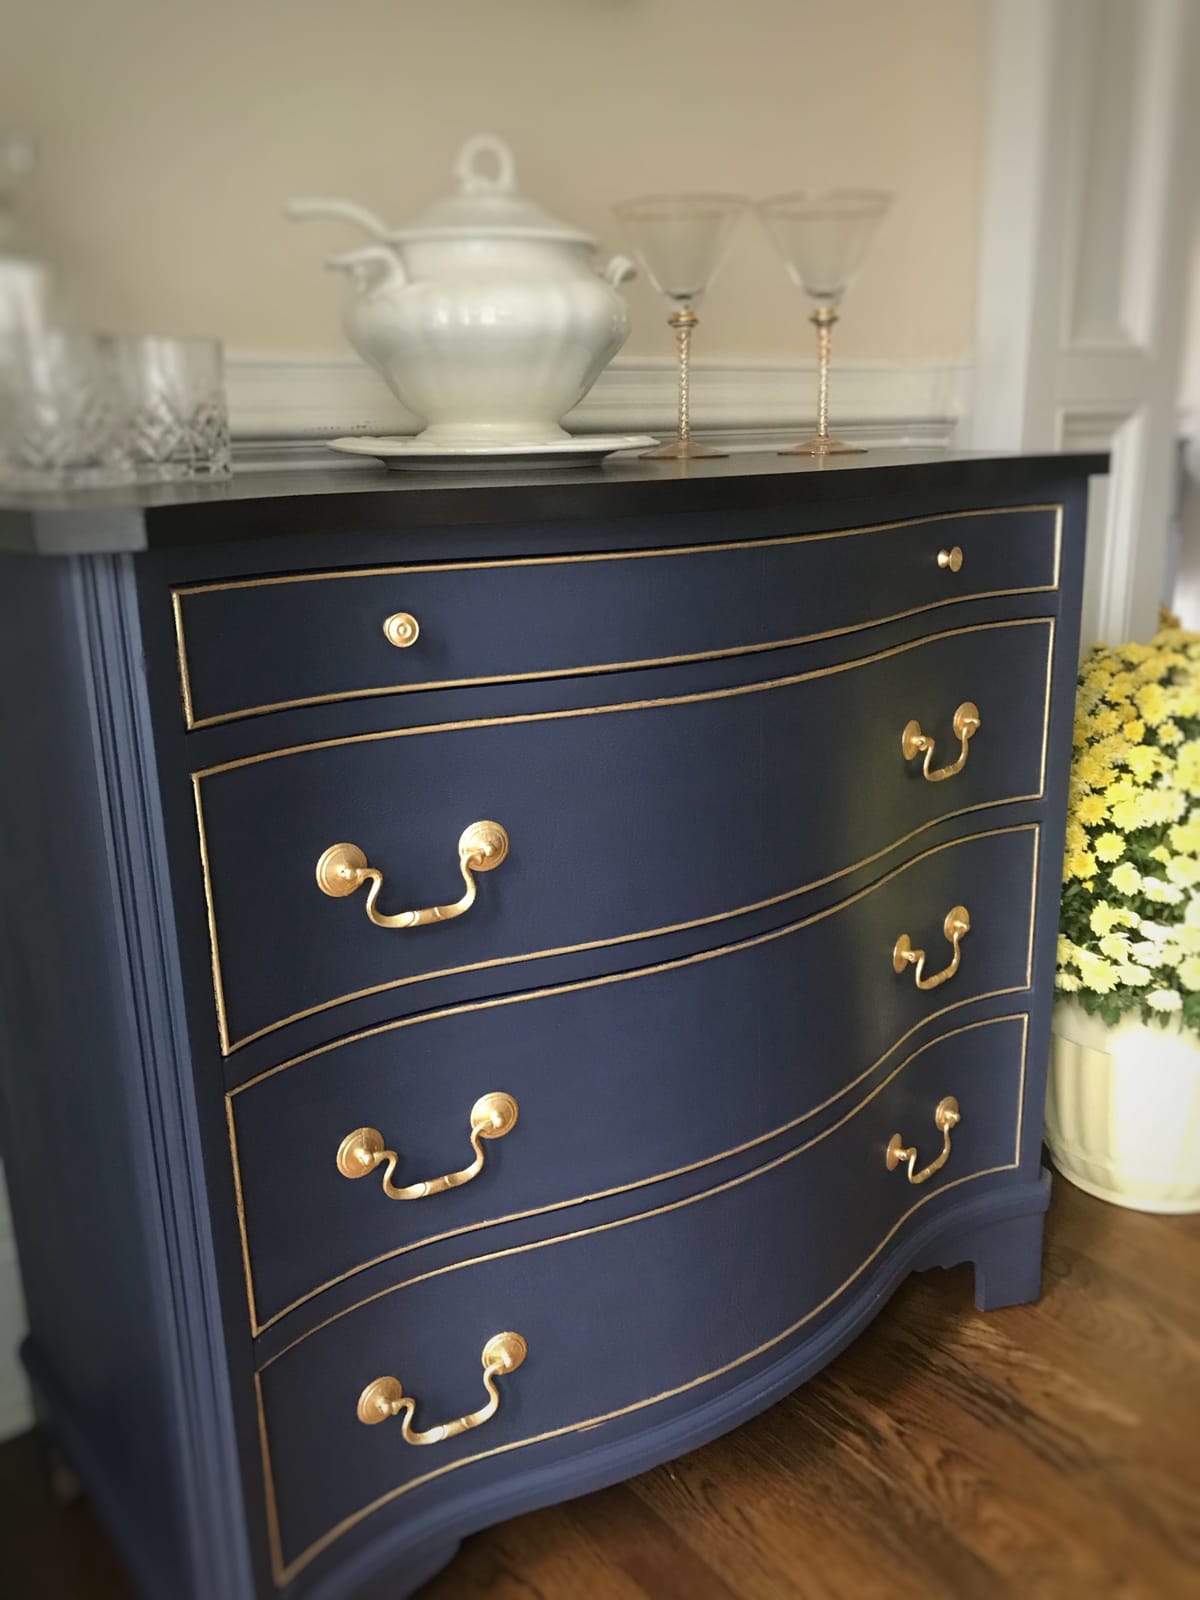
I found this Morganton sideboard in a thrift store while on a visit to Boston. Overall, it was in good shape structurally (it was fine quality Morganton Furniture), was solid wood, had a lovely serpentine shape, raised detail on the drawer fronts, and all the original brass pulls. The downsides were: a yucky felt lined top drawer, some dings in the wood, and the top was scratched up and water stained. Do you think any of those things caused me pause? Nope! Nothing that I couldn’t handle! I already had a vision for it’s future life, and the price was a steal. Sooooo………into the truck it went and came home with me to North Carolina! 🙂

The first thing that I did when I got it home was tear out the gross lining and give it a good cleaning. I used my standard cleaning solution – warm water, white vinegar, and a dash of dawn dish soap. I rinsed the whole piece down with water and a rag after that. If you think there may still be wax, oil, or polish on the piece, you can give it another good wipe down with mineral spirits. You may be tempted to skip the cleaning step if you plan on sanding, but don’t. You will just end up grinding dirt and grime into the wood and that can cause paint adhesion problems later. Prep really is key…..hard work, time consuming, and boring, but key.
I used my orbital sander on the top with 80 grit sandpaper to remove all of the scratches and get down to the raw wood, since I would be staining the top. To smooth the grain, I repeated the process with 150 grit, and again with a 220 grit. Since I did not want a worn, distressed look for this piece, I used wood putty on the body and drawers to repair any dings, divots, or scratches. Once the putty was dry, I sanded the drawers and body with 220 grit sand paper – scuffed enough to remove the finish and give the paint something to adhere to.
The top was stained using an applicator pad and Fusion Mineral Paint’s Stain and Finishing Oil in Cappuccino. The process is pretty simple with this product, as long as you don’t go back over your work. If you see streaking, just let it go and get it on the next coat. The color gets darker and more opaque with each coat. The finish has a really nice sheen, just make sure it dries thoroughly between coats or it can be sticky. If you have a nice grain that you want to show through the stain, stick with just one coat.

The paint that I chose for this piece is called Charcoal Blue by Sherwin Williams. It is a navy blue with purple undertones that I found to be the perfect shade for this old piece. The color reminds me of a stately old, colonial furniture piece and fits perfectly with its age and shape. I also knew that those glorious details were screaming for gold leaf, and this color was the perfect compliment. I turned this paint into a custom chalk paint by adding calcium carbonate, because I like the adhesion and finish of chalk paint better than latex. Fair disclaimer, the calcium carbonate did alter the color a bit, so I am not certain your piece would look the same if you just painted using Charcoal Blue.
I had never tried gold leaf prior to this and I will say, there is a learning curve. The hardest part was putting gold leaf on all of the pulls. The raised details on the drawer fronts were not as challenging. First you use a sizing medium, painted on with a natural bristle brush (the sizing doesn’t really clean off, so use a brush designated for this purpose). Keep in mind that once you put on the sizing, there’s no going back. It gets tacky and stays tacky. *Side note – I got mine online on Amazon – it’s called adhesive size by Mona Lisa. You can also get it and the gold leaf sheets in the craft store, but they are more expensive. In fact, I bought the gold leaf online and paid about the same for 100 sheets as I would have paid for 10 sheets in the craft store. I provided the links for both below.* After you’ve put the sizing on, wait about an hour until it’s tacky. Lay the gold leaf sheet on the adhesive, tamp it down, and brush away the excess with a soft natural bristle brush. I found that brushing with a synthetic brush caused scratching and dulled the finish. You can go back over the areas that you missed with the gold leaf until it’s covered the way you want.
I had removed the green felt from the drawer, but was able to retain the backing that it was glued to. This was lucky because now I had a template and it saved me a lot of time having to measure, create, and fit a new insert. After much searching, I found some lovely fabric at Joann’s that not only matched the unusual color, but also suited the antique colonial feel that I was going for. I cut the fabric to fit the insert and adhered it with spray adhesive. Into the drawer it went and I was thrilled that it matched beautifully! I refreshed the wood in the other three drawers with a few coats of hemp oil. It rehydrates the wood and will harden to a protective coat after a 30 day cure time.

The only thing left to do was to seal the whole piece (excluding the top, which already had a finish). I sealed it using Dixie Belle Clear Coat in satin, applied with a damp sponge. It gives the piece added durability and a nice sheen. I staged the piece and posted it for sale. It sold in 2 hours to someone that fell in love with it. It makes me sooooo happy to know that this formerly junk pile piece is now in someone’s home, bringing them joy! This is what makes me giddy about refinishing these old diamonds in the rough!

Thank you so much for joining me for Sugar Plum Sundae! Please check back every Sunday for more yummy recipes to transform reclaimed “junk” into sweet little treats for the home!
For more delicious treats, follow Sugar Plum Preserves:
Facebook: https://www.facebook.com/SugarPlumPreserves/
Pinterest: https://www.pinterest.com/pinterest/sugarplumpreserves
Instagram: https://www.instagram.com/sugarplumpreserves/
YouTube: https://youtu.be/tQplTZMCjq0
XOXO
Michele
Materials List (may not be all inclusive):
Gold Leaf Sizing, Quart https://amzn.to/36hdOxP
Gold Leaf, Silver Leaf, Rose Gold Leaf, 300 sheets https://amzn.to/3e1vhgr
Natural Bristle Gold Leafing Brush https://amzn.to/3LAVdBu
Orbital Sander https://amzn.to/3e7nwWl
Epoxy Wood Putty https://amzn.to/3cPAlEh
Calcium Carbonate https://amzn.to/2TmGmRa
Dixie Belle Clear Coat Satin https://amzn.to/3bNuzlp
Dixie Belle Blue Sponge https://amzn.to/2X9Hp8k
Paint Brush, Angled 2 inch https://bit.ly/3oI0V9z
Fabric Rotary Cutting Mat and Tool https://amzn.to/2XfFmj2
Spray Adhesive Elmer’s Craft Bond https://amzn.to/2TrcDa1
3 Wheel Dolly, 4 pack https://amzn.to/3bKfilf
Fusion Hemp Oil https://amzn.to/3bLQxoR
Charcoal Blue, Sherwin Williams
Stain and Finishing Oil, Cappuccino, Fusion
*Affiliate disclosure: As an Amazon Associate I may earn a small commission from qualifying purchases from Amazon.com.