Midnight Blue Velvet Cupcake
This week's transformation was a very popular one and I had so many questions about how I created it!
~ A Sweet Little Treat for the Home ~
Midnight Blue Velvet Cupcake
Hello My Sweets!
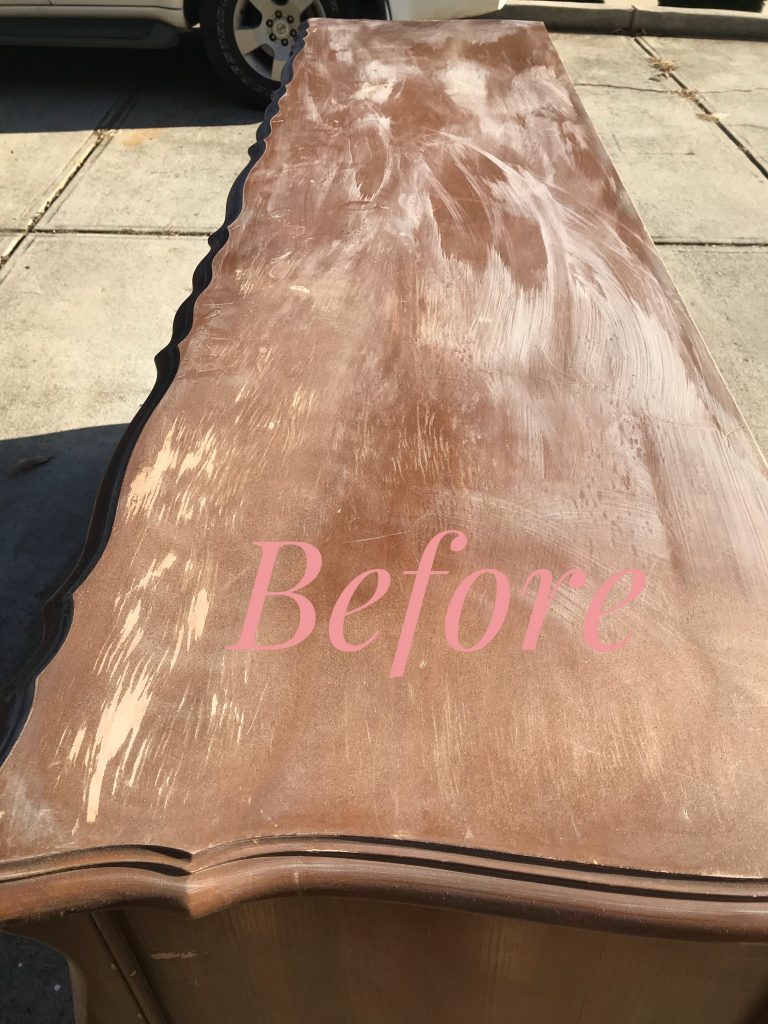
This piece turned out very glamorous, but it’s former life was anything but! I found this piece on Marketplace in Boston for $15. Yes, you read right, $15! I jumped on it and messaged the seller right away. He got back to me a few hours latter and apologized, he had just woken up……. It was 4pm…..Clue number one. 🧐 No matter, my trusty sidekick and I jumped in the truck to go snag it! When we got there, the house was TINY and crammed with stuff, two people, a dog, and a huge fish tank, taking up the remainder of the space. The dresser was in the middle of the room, in the middle of stuff, and the whole place had the pungent aroma of a certain “herb”. The guys were nice enough to help with the loading (albeit, verrrry slow moving 😂 ). The piece was pretty dirty, pretty scratched up, and pretty stinky, but solid. I call that a win! Home to North Carolina it came!

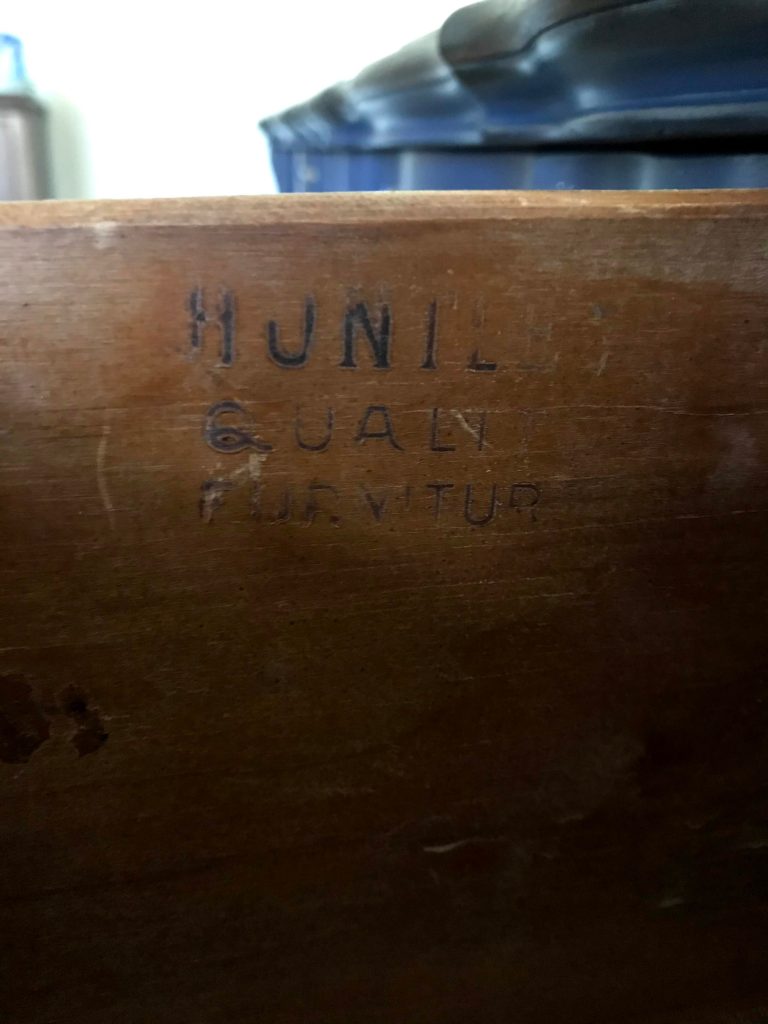
As always, the first thing that I did was get to cleaning! I used my usual concoction of dawn dish soap, white vinegar, and warm water. The inside had a “weird” (read yucky 🤢 ) smell, so it took a lot of scrubbing and spraying with vinegar and leaving it (and the drawers) to dry in the sun. While I was cleaning, I noticed the stamp inside that indicated it was made by the Huntley Furniture Company. I had not heard of this brand before so I turned to the internet. It turned out that Huntley was a high end, very well made, fine furniture maker. Double score! Well, that explained why it was in such good shape, structurally, despite it’s less than ideal past living situation.
Once it was clean, I got to sanding. I used my orbital sander for the top, my mouse sander for the sides, the drawer fronts, and some of the scrolled edges. I used sand paper for the rest of the edges that I couldn’t get with my mouse. I used several different grits on this. I used 80 on the top to get some of the deep scratches out and the went up in grit – 120, then 220, to smooth out the grain. For the rest, I used 120 grit, then 220 to smooth out the grain. There was A LOT of sanding involved!!
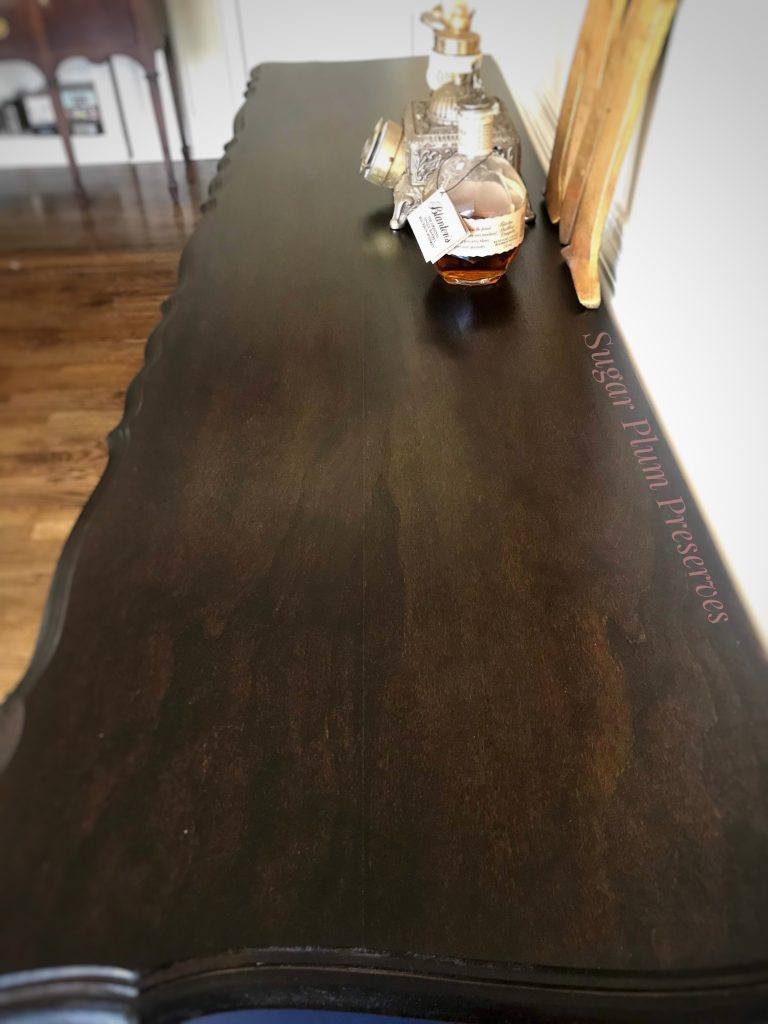
I got out my shop vac and cleaned inside the body and drawers. I then went over the whole piece with water to rinse any sawdust or cleaning solution residue. I was able to sand the top smooth, so I decided to stain the top and paint the body. Using stain was intimidating to me at one point. I’m not sure why I had a block about it, but it really couldn’t be more simple. I like to use Minwax brand stain and have found that the Walnut color never lets me down. I use a stain applicator pad and go in a long continuous stroke down the length, using the pressure of my fingers to apply. I keep the coats thin and have a slight overlap with each stroke. I then go over the overlap so that there are not darker stripes every few inches. And that’s really it! I wait a whole day before I add another coat to darken the finish, need be. You really want to make sure it is completely dry before you add additional coats, or it will be sticky and remain sticky, and that’s a huge bummer! I think I will do a video on my exact technique, so keep an eye out in the future for that. I also have included a materials list and link to products at the end to make it easier to find the products that I used.
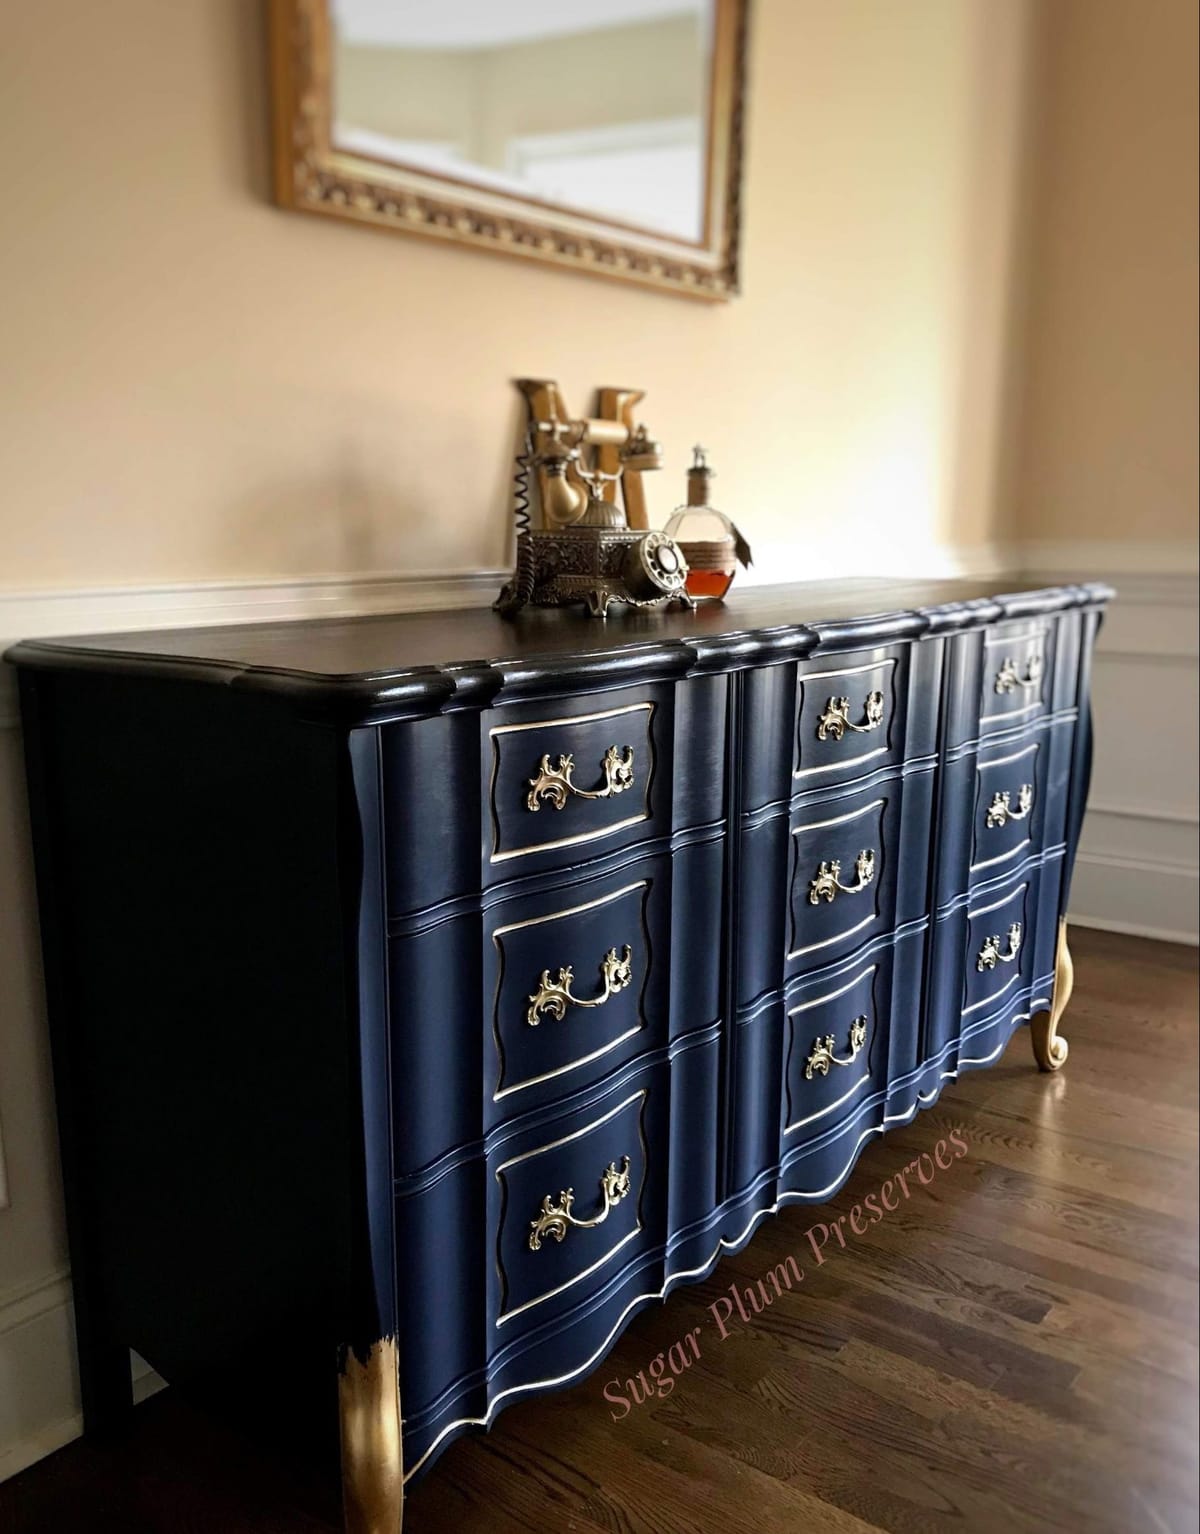
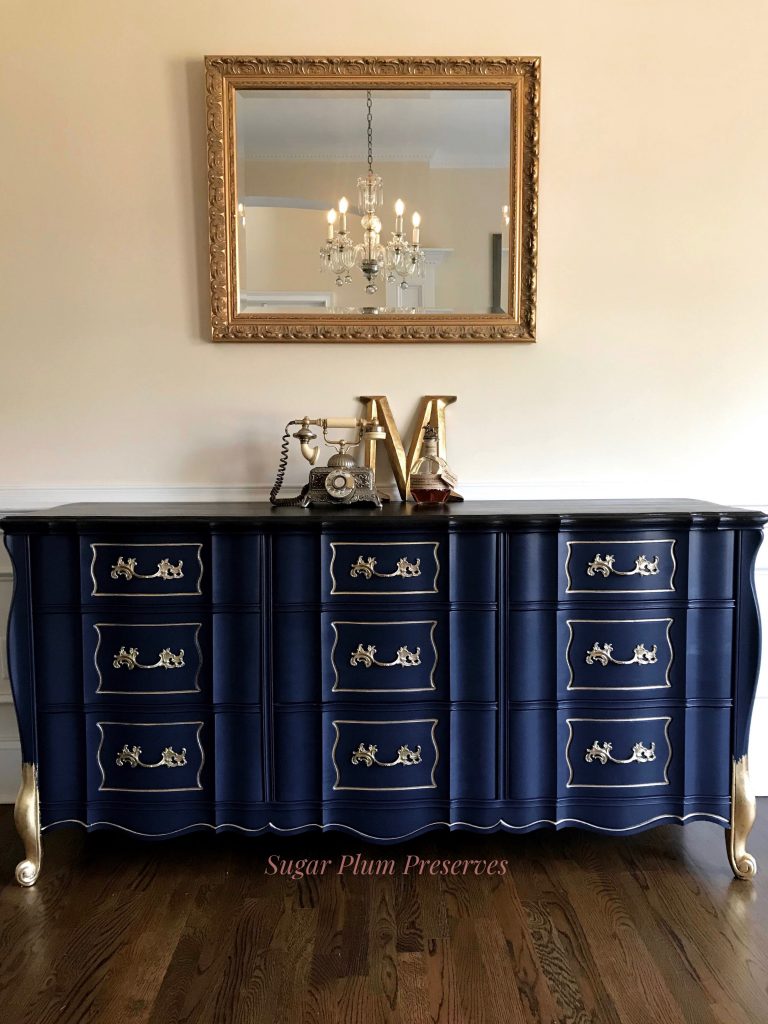
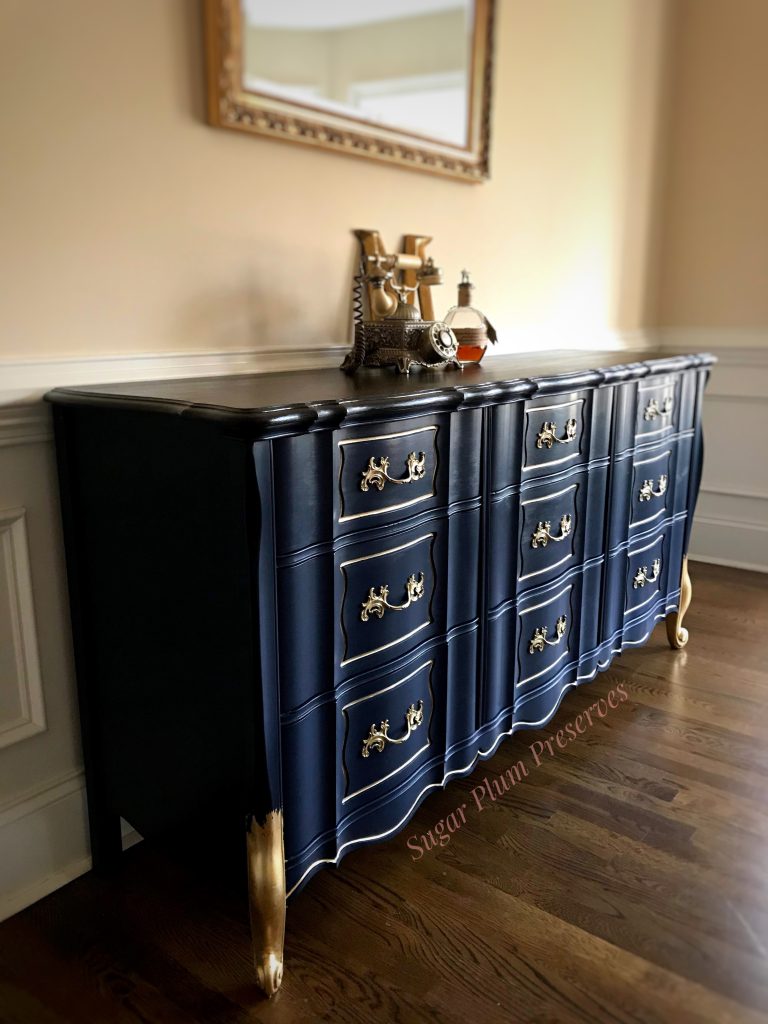
I always choose to paint after stain instead of the other way around. I think I would be more likely to drip stain down onto the painted body than accidentally get paint on the stained top. It’s just my preference, not the only way to do it. The paint that I chose for this piece is Anchors Aweigh, by Sherwin Williams. I had a sample on hand from a prior project and thought it would be the perfect navy, without really being navy, if you know what I mean? I wanted this piece to radiate glamour, not have a nautical feel and this color was the perfect choice! I always paint with a paint brush. For this project, I used my go to – 2 inch angled Zibra paint brush. I have tried painting with a roller, but I can’t deal with the texture marks. I think I may be a little bit of a control freak when it comes to painting. 🙄 I did 3 coats on this piece.
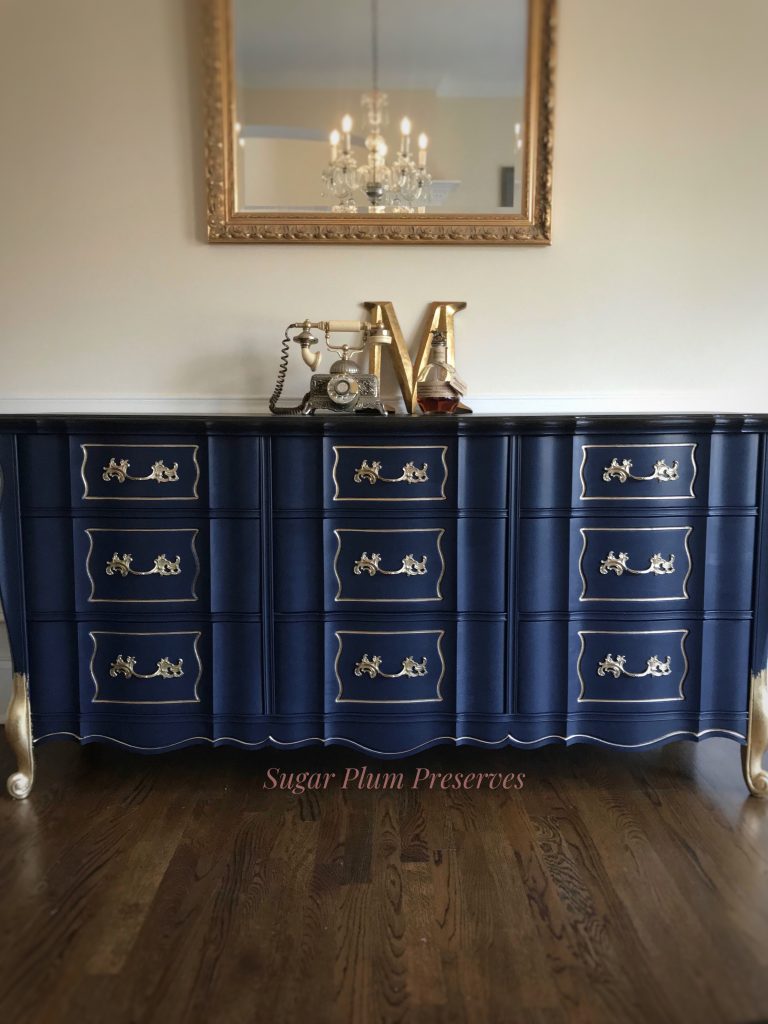
Once the paint dried, I turned my attention to all of the wonderful details. I used a gold oil paint pen https://amzn.to/3pJ9y4H and trimmed out all of the details around the pulls and the apron. The pull are original, unpainted! I don’t seem to have pictures of the pulls before, but they were black. It took me 3 days of scrubbing with Bar Keepers Friend and a toothbrush, but what a gorgeous reward! These pulls are exquisite! 😍 French Provincial style holds a special place in my heart.
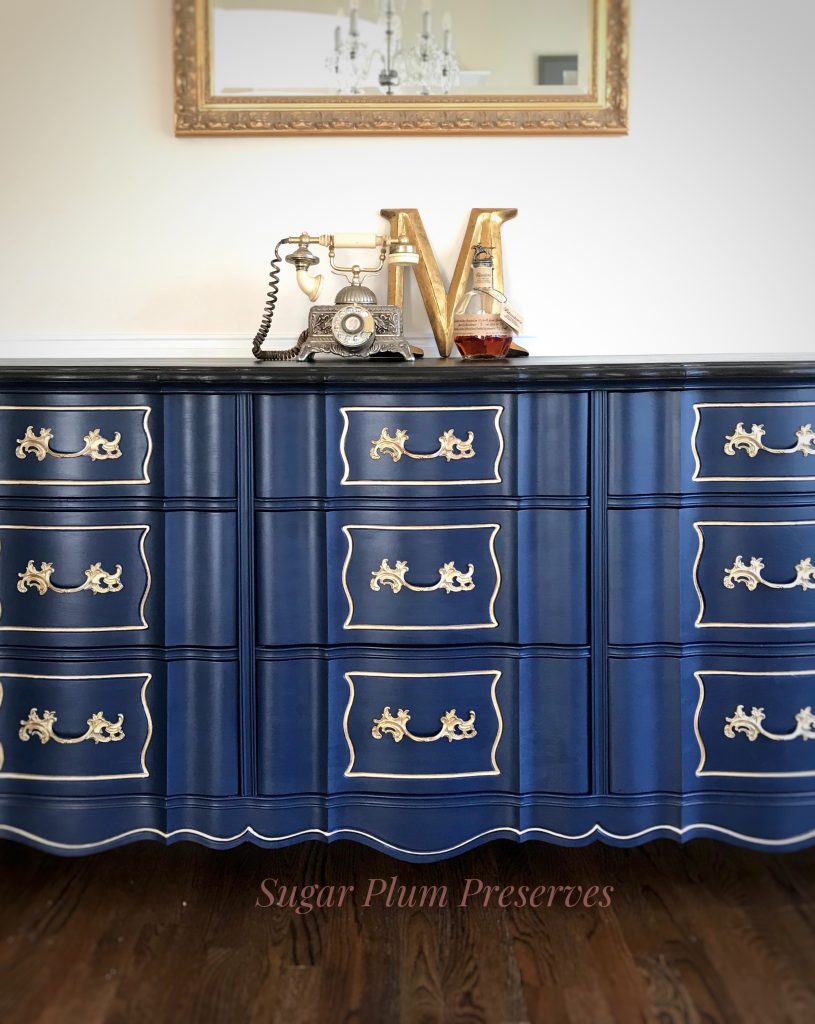
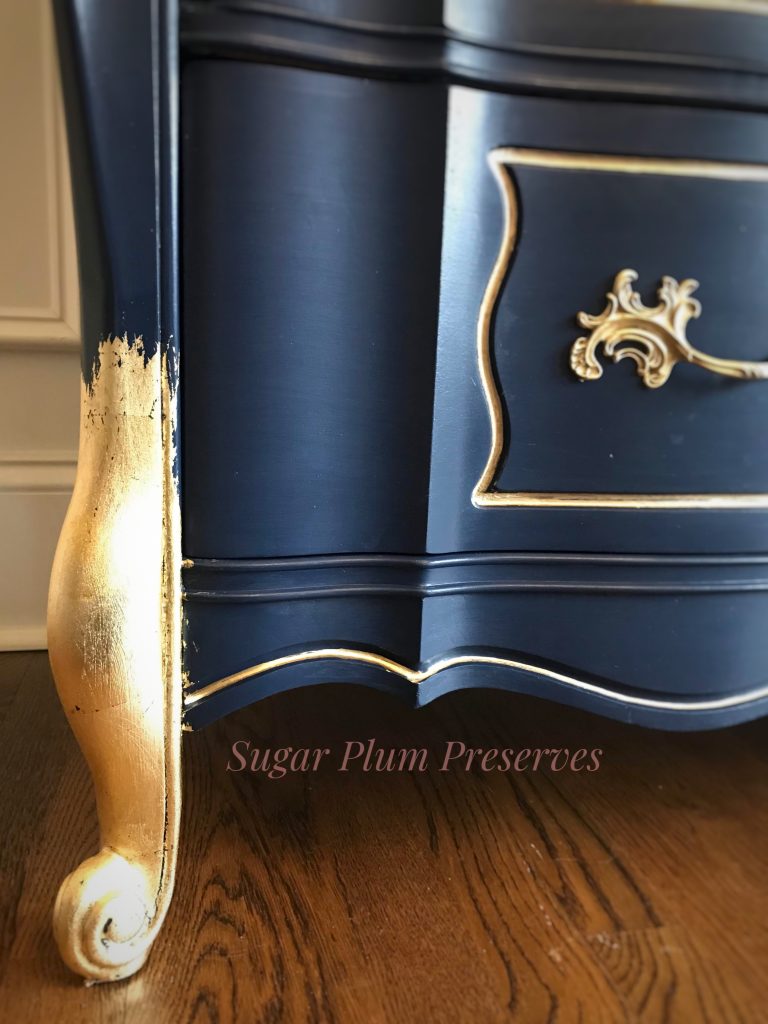
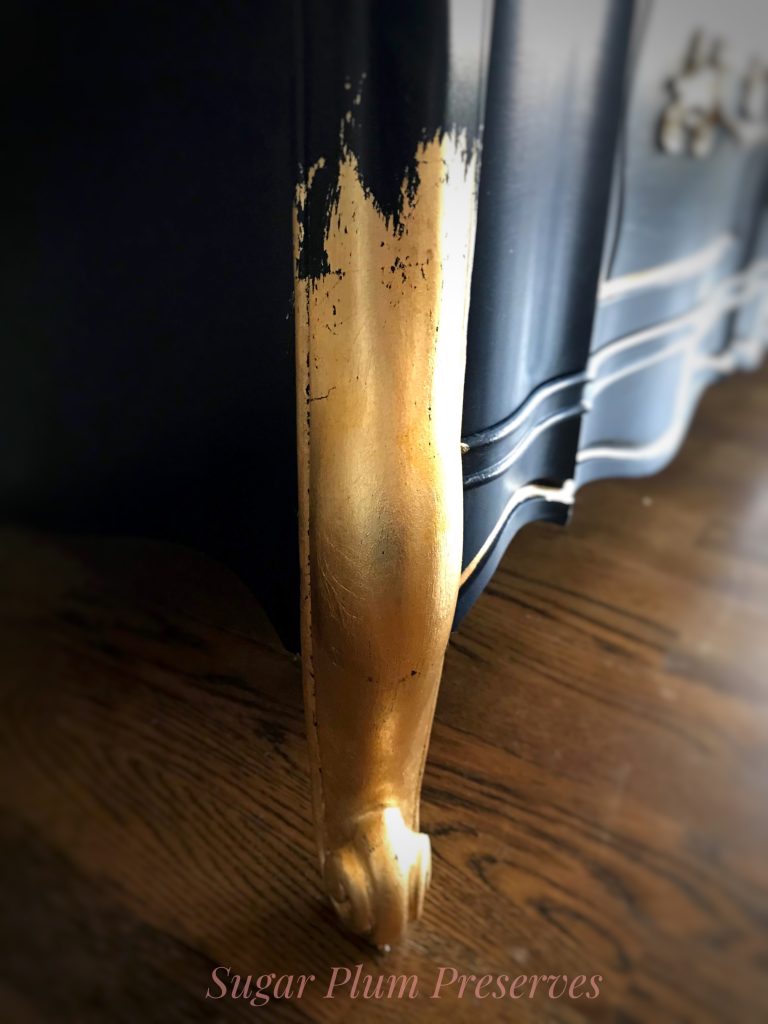
I’m on a glamour roll, why stop there?? Those curvy legs were just begging for something special and something special I gave them! Gold Leaf!! ⚜️ I ordered the gold leaf and sizing (adhesive) on Amazon. You can buy them in the craft store, but it is 10 times the cost. To apply the sizing, use a small brush that you will designate for this purpose. You will never get the sizing out of the brush and you will ruin your brush, so trust me on that. The sizing just gets painted on wherever you want the gold leaf to be. The gold leaf will stick only to the areas of sizing and brush off elsewhere. Paint on the sizing and wait until it gets tacky and has dried clear. Place the sheet of gold leaf on the area, tamp it down, and brush off the excess. I wrote a detailed blog about this process if you would like further instruction: https://sugarplumpreserves.com/2020/04/12/madeleine/
Holy moly, that was just the special that it needed! Wouldn’t you agree? 🤩
The whole piece was sealed with a few coats of Minwax Satin Polycrylic for a nice sheen and extra durability. The inside of all the drawers were refreshed and given a “drink” of hemp oil. Hemp oil can turn dry wood into rehydrated, beautiful wood again. It can also act as a topcoat for a nice sheen on a painted or unpainted surface.
Thank you so much for joining me for Sugar Plum Sundae! Please check back every Sunday for more yummy recipes to transform reclaimed “junk” into sweet little treats for the home!
For more delicious treats, follow Sugar Plum Preserves:
Facebook: https://www.facebook.com/SugarPlumPreserves/
Pinterest: https://www.pinterest.com/pinterest/sugarplumpreserves
Instagram: https://www.instagram.com/sugarplumpreserves/
YouTube: https://youtu.be/tQplTZMCjq0
XOXO
Michele
Materials List (may not be all inclusive):
Angled 2 inch Stubby https://bit.ly/3oI0V9z
Minwax Dark Walnut Stain https://amzn.to/3e7D1h8
Stain Applicator Pad https://amzn.to/2Xfun9d
Gold Leaf Sizing, Quart https://amzn.to/36hdOxP
Gold Leaf, Silver Leaf, Rose Gold Leaf, 300 sheets https://amzn.to/3e1vhgr
Natural Bristle Gold Leafing Brush https://amzn.to/3LAVdBu
Gold Paint Pen https://amzn.to/3pJ9y4H
Detail Brush, Royal Brush Crafters Choice Variety https://amzn.to/2Xjc0jI
Fusion Hemp Oil https://amzn.to/3bLQxoR
Detail Sander https://amzn.to/3eauZEb
Orbital Sander https://amzn.to/3e7nwWl
Minwax Water Based Polycrylic, Satin https://amzn.to/3g7e7Qw
3 Wheel Dolly, 4 pack https://amzn.to/3bKfilf
Anchors Aweigh, Sherwin Williams
*Affiliate disclosure: As an Amazon Associate I may earn a small commission from qualifying purchases from Amazon.com.