Snowball Cookie
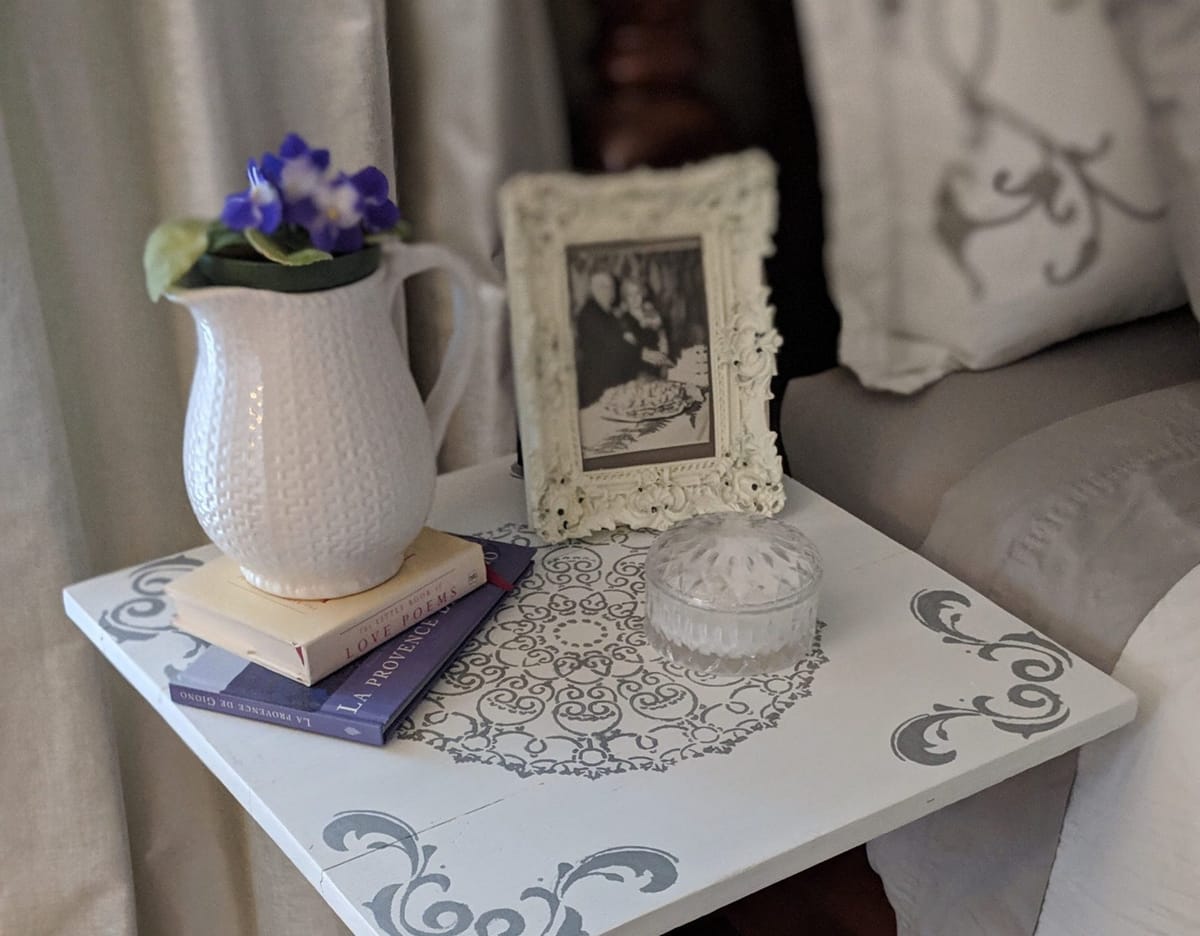
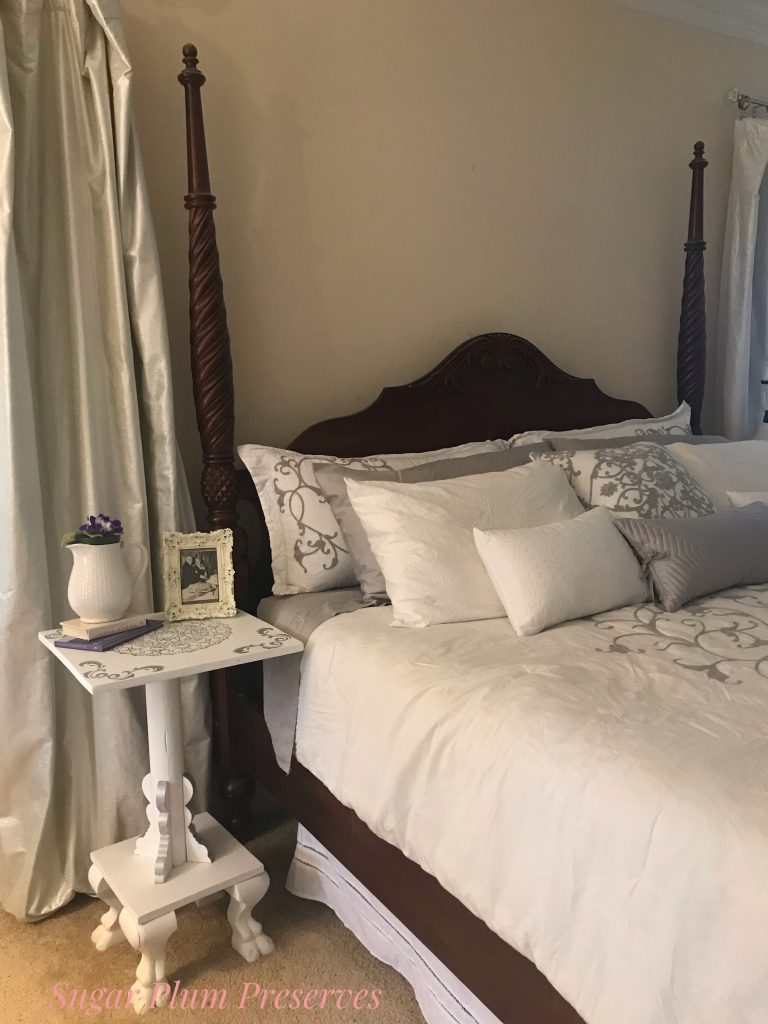
This week's feature is an awkward, broken side table transformed into a lovely bedside table.
~ A Sweet Little Treat for the Home ~
Snowball Cookie
Hello my Sweets!
This week, I decided to start the first post in a series of blog posts about transforming our bedroom. I will post a new piece each week that I have transformed. Once all of the pieces have been completed, I will post an entire before and after of our bedroom with all of the pieces included. In the beginning of the year, one of my resolutions was to give attention to our bedroom. Currently, it is a mismatch of furniture with no real flow or sense of cohesiveness. Well, that may not be accurate – the curtains, pillows, bedding, and one bedside table (this week’s feature) match, but that’s where it ends. It is definitely not the retreat that I envision for us. I am a person who is extremely influenced by the “feel” of their environment, and I need the bedroom to be a place that I love and can relax in. With the stay at home order currently in place, I figured now would be a great time to transform our bedroom and give us somewhere for some much-needed peace. Maybe now would be a good time for you too! Feel free to ask any questions along the way for creating your own retreat.
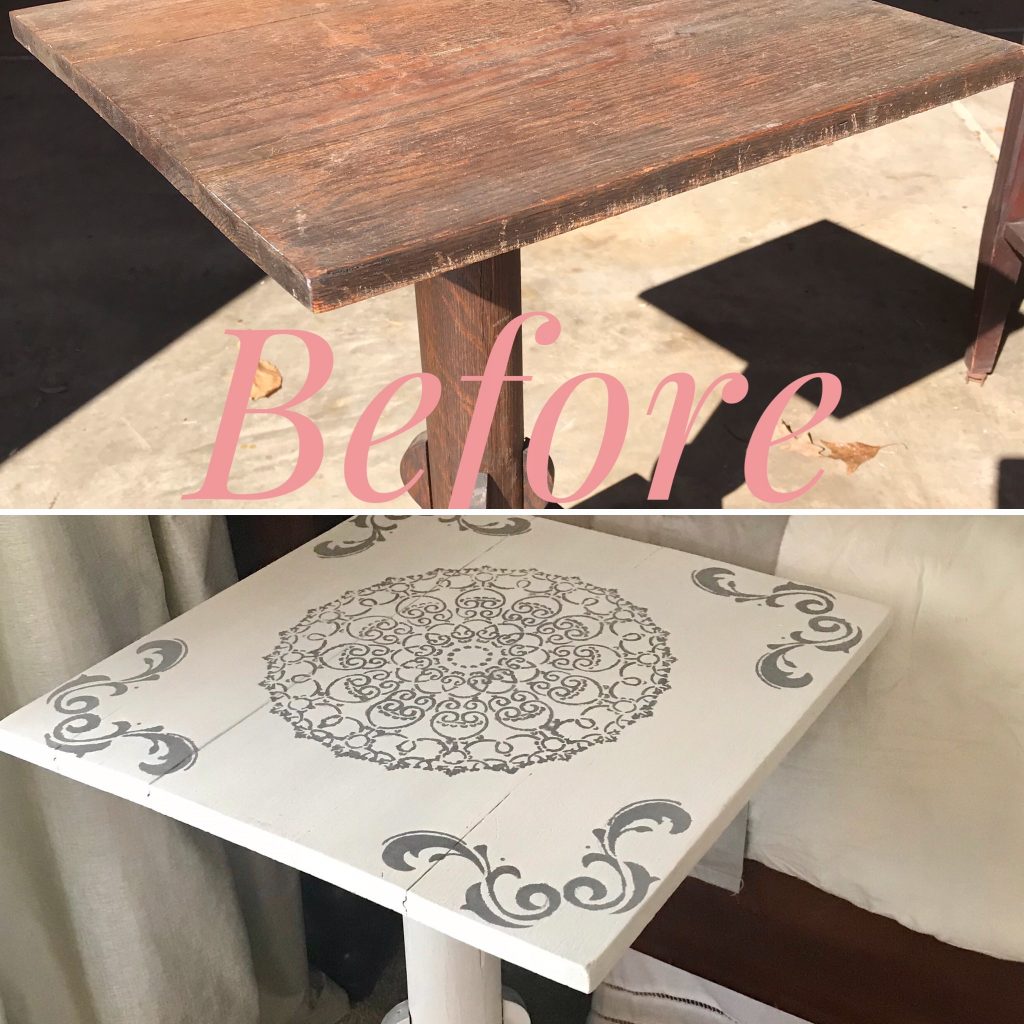
I found this side table at a garage sale for $5. It was broken at the bottom, but had some cool claw feet and it seemed wonky enough to be handmade. It was also a great height for a bedside table because our bed is quite a bit higher than a standard bedside table. I knew that I could fix it up, so for $5, I figured, what the heck?

As you can tell from the picture, the stain on the table is quite dark and has definite orange tones. This would definitely be a bleeder. As I have said before, the best solution for this is a shellac based primer. I use BIN shellac based primer because I know it works. I have tried other water based primers that claim to be bleed proof and have had to redo the whole thing in BIN because it turned pink. I use a cheap throw away chip brush for the application. Anyone that knows me, knows that I HATE waste, but this is one battle that I have succumbed to. It is next to impossible to clean your brush of this primer, so trust me on this one. You can get a whole box of chip brushes cheap. I provided a link below.
Once the primer was completed ( I used two coats, lightly sanding between coats), I painted the whole piece in a custom made chalk paint. I get calcium carbonate on Amazon and add it to my paint of choice. The paint in this case is Behr Bit of Sugar in flat. I went with two coats to create a nice finish and just to be sure that I didn’t miss anywhere. Once dry, I lightly sanded with 220 grit sandpaper to bring out that deliciously smooth chalky finish.
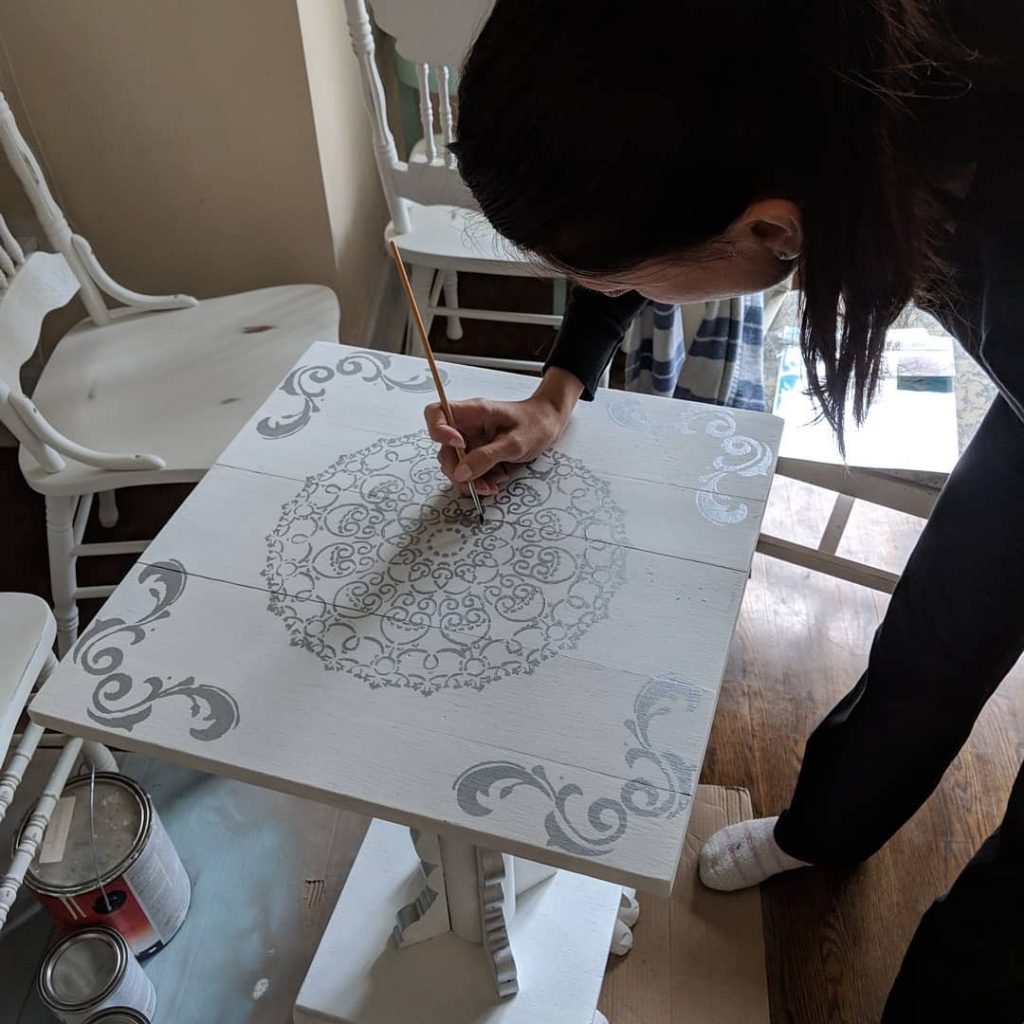
I decided to add a stencil to the top to tie in the pattern on the pillows and bedspread. I think that I got the stencil at Michael’s, but it may have been Hobby Lobby. Sorry, I can’t remember. I placed the stencil on top of the table and secured it with tape. I used some silver paint that I had on hand – Polished Silver by Martha Stewart. The best way to stencil is to put very little paint on the brush, dab it off on a paper towel, and use a pouncing technique with a very firm bristle brush or sponge pouncer. I prefer to use the sponge pouncer to reduce the chance of the bristles getting under the stencil and cause bleeding. Even with the pouncer, there was some bleeding and imperfections that I had to fix with an artists brush.
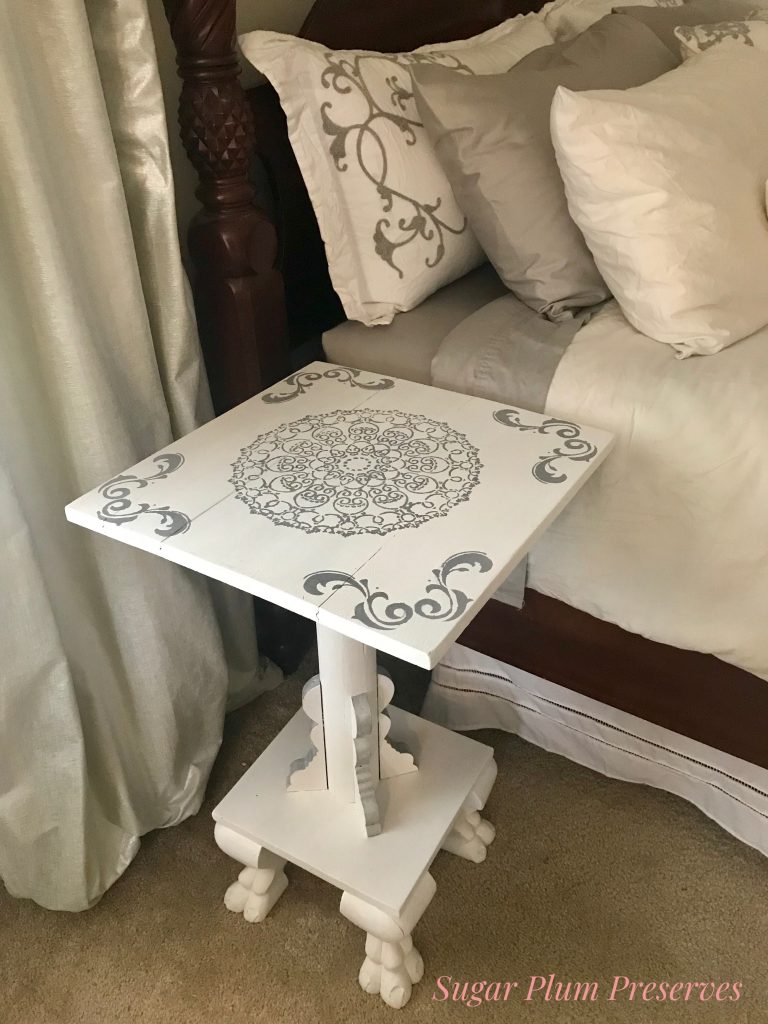
The only thing left to do was seal it! I used a few coats of Rustoleum Chalked Topcoat in Matte Clear. This is the first completed piece in my journey to create a beautiful, calm space in our bedroom. Please check in next week for another transformation along the journey.
Thank you so much for joining me for Sugar Plum Sundae! Please check back every Sunday for more yummy recipes to transform reclaimed “junk” into sweet little treats for the home!
For more delicious treats, follow Sugar Plum Preserves:
Facebook: https://www.facebook.com/SugarPlumPreserves/
Pinterest: https://www.pinterest.com/pinterest/sugarplumpreserves
Instagram: https://www.instagram.com/sugarplumpreserves/
YouTube: https://youtu.be/tQplTZMCjq0
XOXO
Michele
Materials List (may not be all inclusive):
BIN Shellac Primer, Quart https://amzn.to/3g8fuyb
Chip Brush, 3 inch, 24 pack https://amzn.to/2WNntJf
Calcium Carbonate https://amzn.to/2TmGmRa
TiteBond Wood Glue https://amzn.to/2LLxIHP
Paint Brush, Angled 2 inch https://bit.ly/3oI0V9z
Detail Brush, Royal Brush Crafters Choice Variety https://amzn.to/2Xjc0jI
Minwax Water Based Polycrylic, Matte https://amzn.to/36h3kys
Topcoat Applicator, Car Detail Sponge https://amzn.to/2ANgY0K
Epoxy Wood Putty https://amzn.to/3cPAlEh
Mandala Stencil https://amzn.to/3S7PYvt
Scroll Stencil (similar) https://amzn.to/3xK1XHB
Painters Tape https://amzn.to/363jJrh
Silver Metallic Paint https://amzn.to/2ZT4HlF
Bit of Sugar, Behr
*Affiliate disclosure: As an Amazon Associate I may earn a small commission from qualifying purchases from Amazon.com.